hsfzxjy (Jingyi Xie)
欢迎来到我的互联网一隅。我会在这里分享自己的思考与实践,关于技术,关于研究,关于生活,关于社会,关于我感兴趣的一切。Welcome to my hidden corner of the internet. Here, I share notes, reflections, and projects on the things that interest me: technology, research, life and society.
联系方式 / Contacts论文 / Publications
此处收录了我在 计算机视觉 与 信息安全 等领域发表的论文。Published papers in computer vision, information security, and related fields.
- Threat in Frequency: Unveiling Hidden Attack Surfaces by Exploiting Stealthy Backdoors on Diffusion Models (TPAMI 2026)
Jingyi Xie, Jiawei Liu, Fanrui Zhang, Dong Li, Xueyang Fu, Zheng-Jun Zha.
Paper - Towards Effective and Transferable Detection for Multi-modal Fake News in the Social Media Stream (TKDE 2025)
Jingyi Xie, Jiawei Liu, Zheng-jun Zha.
Paper - Adaptive Texture and Spectrum Clue Mining for Generalizable Face Forgery Detection (TIFS 2023)
Jiawei Liu, Jingyi Xie†, Yang Wang, Zheng-jun Zha.
Paper - SegFix: Model-Agnostic Boundary Refinement for Segmentation (ECCV 2020)
Yuhui Yuan*, Jingyi Xie*, Xilin Chen, Jingdong Wang.
PaperCode - ABD-Net: Attentive but Diverse Person Re-Identification (ICCV 2019)
Tianlong Chen, Shaojin Ding*, Jingyi Xie*, Ye Yuan, Wuyang Chen, Yang Yang, Zhou Ren, Zhangyang Wang.
PaperCode - ESCNet: Entity-enhanced and Stance Checking Network for Multi-modal Fact-checking (WWW 2024)
Fanrui Zhang, Jiawei Liu, Jingyi Xie, Qiang Zhang, Yongchao Xu, Zheng-Jun Zha.
Paper - Natural Language-centered Inference Network for Multi-modal Fake News Detection (IJCAI 2024)
Qiang Zhang, Jiawei Liu, Fanrui Zhang, Jingyi Xie, Zheng-Jun Zha.
Paper - Hierarchical semantic enhancement network for multimodal fake news detection (ACM MM 2023)
Qiang Zhang, Jiawei Liu, Fanrui Zhang, Jingyi Xie, Zheng-Jun Zha
Paper - ECENet: Explainable and Context-Enhanced Network for Muti-modal Fact Verification (ACM MM 2023)
Fanrui Zhang, Jiawei Liu, Qiang Zhang, Esther Sun, Jingyi Xie, Zheng-Jun Zha.
Paper
网站目前收录了 146 篇博文。订阅更新 或 阅读全部 →There are currently 146 blog posts. Subscribe or Read All →
技术 / Tech
「技术」分区目前收录了 93 篇博文,记录对 软件底层机制、编程语言、AI 部署与基础设施 与 开发体验改进 的剖析与见解。The "Tech" section currently includes 93 posts on low-level software mechanisms, programming language semantics, AI deployment and infrastructure, and developer experience improvements.
最新文章 / Recent Posts
呓语 / Soliloquy
「呓语」分区目前收录了 22 篇博文,记录一些关于 生活、社会、互联网 的奇思妙想,也收留那些不太适合归入技术分类的念头。 The "Soliloquy" section currently includes 22 posts about curious thoughts on life, society, and the internet, as well as ideas that do not quite fit into the Tech section.
最新文章 / Recent Posts
项目 / Projects
handwriter.ttfGithub
一款内嵌了笔迹生成模型的字体,可在编辑器中即时合成手写风格的文本。A cursed font with an embedded handwriting generation model that can synthesize handwritten-style text in editor.
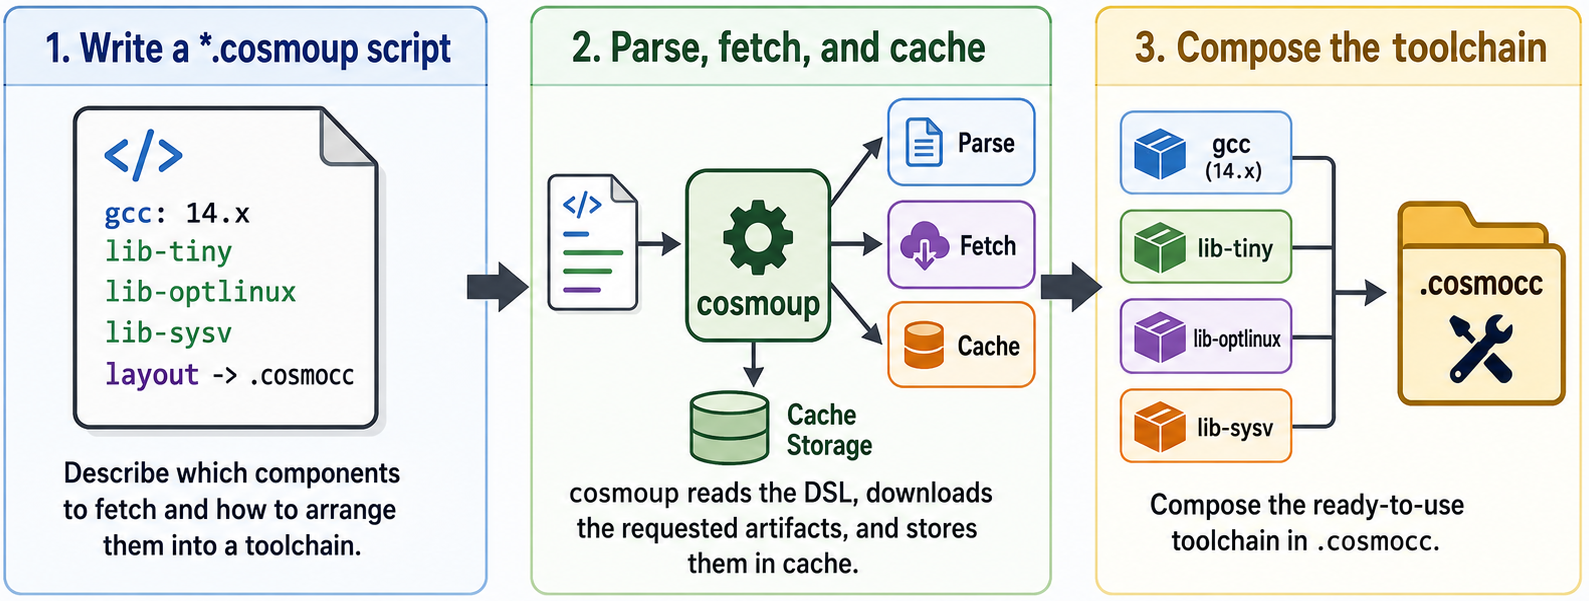
cosmouvGithub
一次编译即可处处运行的 C 异步 IO 库。(libuv 的 Cosmopolitan C 版本)Build-once run-anywhere C async IO library. (libuv port to Cosmopolitan C)

lambdexGithub
Python,但是 lambda 函数能写多行。Python with multi-line lambda functions support.
def_(lambda n: [
    if_[n <= 0] [
        raise_[ValueError(f'{n} should be positive')]
    ],
    if_[n <= 2] [
        return_[1]
    ],
    return_[callee_(n - 1) + callee_(n - 2)]
])(10)  # 55
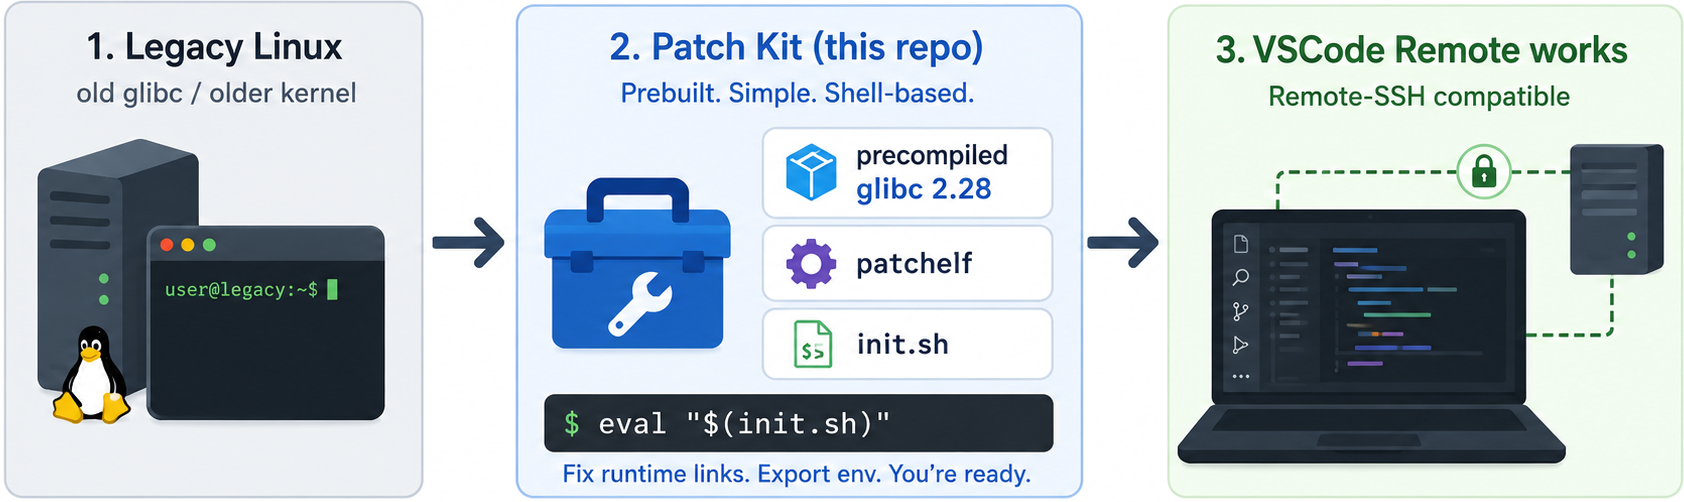
vscode-remote-glibc-patchGithub
为旧版 Linux 系统准备的 glibc 补丁,使其能运行新版 VSCode Remote。Patch glibc on legacy Linux systems to enable compatibility with the latest VSCode Remote.